Like the other programmes, opening an Indesign document is found in File, then new, then document. Make sure all the measurements are correct including the bleed margin and gutter. the standard amount of bleed (trimming) is 3 mm, however this depends on what is being printed. The slug is the area outside the page but will printed such as crop marks or trimming marks.
Increase the number of pages and tick 'Facing pages' if a book format of a publication is being designed.
This is what the layout would look like. The first and last pages are always single pages and the ones in between are facing. The 'A' page is the 'Master page' meaning that whatever you put on the master page will appear on the other pages.


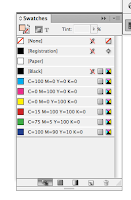
The colour picker and swatches is set out in a very similar way to illustrator. The swatches contain CMKY and RGB. To apply colour, click on the colour than the watch box in the corner of the swatches pallet.
To apply colour to text, simply click on the small 'T' box in the corner of the swatches pallet.
Making a new swatch colour is executed in the same way as illustrator.

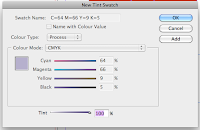
Creating a tint, simply go to 'New swatch tint' then using your cursor scroll left or right on the tint bar, increasing and decreasing the tone. Then a tint of your original colour will be added to your swatch pallet.
Photoshop for InDesign
1. CMKY or GREYSCALE (No colours RGB.
2. 300 dpi.
3. Actual size (do not enlarge in InDesign.
4. Save as a PSD or TIFF (don't support transparency) file.
Illustrator for InDesign
1. CMKY (No colours RGB)
2. Save as AI. or copy and paste.
3. Can scale artwork within InDesign
Placing Images
Go to file, place, image. When placing in a photoshop image it needs to be scaled within photoshop and then placed into InDesign. Don't change the scale whilst in InDesign as it will change the resolution.
However when placing Illustrator files, you can change the scale of the image within Indesign. But by placing the image straight from the file, the quality may be lost. To prevent doing this, open the originally Illustrator file and copy the image. Then return to the InDesign file and go edit paste. This is will gain maximum quality.
Save as photoshop file if using Transparency.
Printing


No comments:
Post a Comment